Emerging from the 3D Maze
Last month I said that I would probably be showing off a mostly usable 3D renderer in my next post. Well, that’s true! But there were certainly some twists and turns along the way.
Let’s start from where we left off, shall we? After getting polygon fills working, most games were looking pretty boring without any lighting or textures; I decided to start with the latter. It turned out to be pretty straightforward! …Or so I thought. My initial implementation seemed to work well enough for simple things, such as games that use the 3D engine to render 2D elements. However, more complex 3D scenes had some nasty texture warping. I discovered that I had overlooked something extremely important: perspective correction. When you look at something in 3D, the parts that are farther away appear smaller, right? Well, the same idea applies to texture mapping; if a polygon extends away from the screen, the texture should appear larger up front and gradually get smaller as it goes back. My original, naïve interpolation attempt was a simple linear interpolation, meaning that effect was lost. Here’s an example of what this looked like, using the portalDS homebrew:
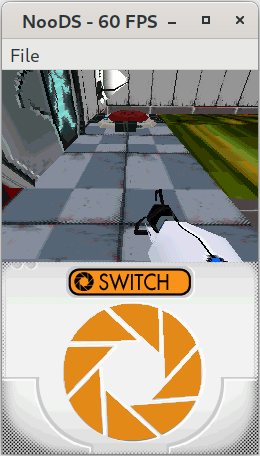
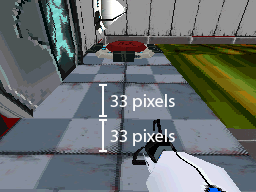
The squares at the back of that tile are way longer than the ones at the front, right? Well, they’re actually the same! But it looks wrong becuase of the perspective. This might give you a better idea:
The solution to this problem is a modified interpolation formula that incorporates the W values of vertices. The W values are essentially depth values; when a vertex goes through a projection matrix, the original X, Y, and Z coordinates are multiplied with values of the projection matrix to create the W value. Depending on the projection values, you can create different kinds of perspective effects, but generally you want vertices that are farther away to have higher W values, and vertices that are closer to have lower W values. Since the W values were already being calculated by my geometry code, all I had to do was adjust the formula in the renderer, and voilà! That confusing perspective problem was no more.
The other major area of issue for me was clipping. Remember the exploding vertices that I mentioned in the last post? Those were actually the result of vertices outside of the view area being projected onto the screen. When out-of-bounds vertices go through a projection matrix, chaos ensues. 3D renderers commonly use clipping to avoid this issue; polygons that are completely outside of the view area are removed, and polygons that are partially visible are reconstructed with new vertices located at the intersection points between the old polygon edges and the edges of the view area. This results in a 3D scene where all rendered polygons are completely within the view area, so they can all be properly projected on the 2D viewing plane. The DS, of course, has clipping too. However, I, not knowing anything about 3D, incorrectly assumed that clipping wasn’t important, and that I could get away with simply not drawing any sections of the polygons that were out of bounds.
Well, I was clearly wrong. After a while of messing around with my code, trying to figure out the source of my vertex woes, I slowly came to realize the true importance of clipping. I dreaded having to implement it, but I found the Sutherland-Hodgman algorithm and managed to write a fairly competent clipping system based on it. With that out of the way, I was finally able to see all the beautiful geometry of those previously broken games!

At this point, the renderer was starting to look almost competent. The last big feature it needed was lighting. GBATEK graciously provides the formulas the DS uses to calculate lighting, so there wasn’t much that I needed to figure out on my own for this one. Basically, lighting works by assigning a normal vector to each vertex; this vector indicates the direction that the vertex is facing. The normal vector is then multiplied with a light vector to determine the intensity of the light hitting that particular point. With the help of those fancy formulas, a color is calulated for each vertex, which is then interpolated across the polygon surface and blended with a texture during rendering. It was easy enough, although I struggled for a stupid amount of time trying to figure out why my math wasn’t working, until I finally figured out that I was supposed to shift the result right to “normalize” it after multiplying two colors together. GBATEK, you’re great and all, but some clarification on that point would have been nice!
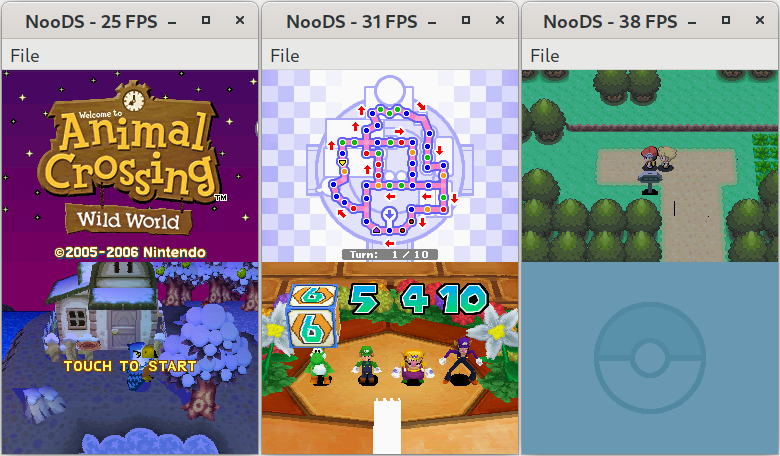
So now we’ve reached the present, and the NooDS renderer is looking pretty good! There are of course still accuracy issues to iron out, as well as the remaining missing features such as alpha blending and shadow polygons. Oh, and it’s in dire need of optimization. But aside from that, most 3D games should be pretty playable! So, what’s next? Even though there are still things left to tackle in the 3D department, I think I might move on to audio emulation soon. 3D is cool and all, and I’ve learned a lot, but it’s been all about 3D for a while now and I think it’s time to change it up a bit. Looking further into the future, I’ll probably make some sort of settings system for the UI, including must-haves like control remapping and screen layouts. After that, I think it would be cool to do some sort of formal release! I’ll figure out the specifics on that later, though. For now, I’m just glad I was able to create a fairly competent 3D renderer! Well, see you all next time for the audio edition of these posts! (Although, how am I going to screenshot audio…?)