A Bit of a Milestone
Oh jeez, it’s been almost a month since my last progress update. That doesn’t mean there hasn’t been progress, though! I was actually able to keep my motivation somewhat steady throughout this past month, and a decent amount of things got done. I’ve been holding off on writing another update post though, because I had a specific goal in mind that I wanted to achieve before doing so.
So let’s run through what’s new. The first thing I did after getting text layers working was add support for extended palettes, because I noticed that a lot of homebrews were completely missing graphics, even when they utilized text layers. Extended palettes allow a program to use a bigger block of VRAM for palettes instead of the standard 1KB blocks. Turns out, the majority of the homebrews I tested were trying to use this, and once I implemented it I saw graphical output from a lot more things.
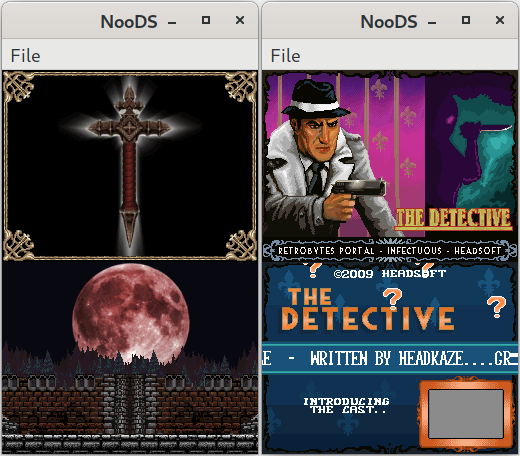
On the left here is a Castlevania fan game demo, looking super fine with all those text layers. On the right is a Detective homebrew game that seems pretty legit, though I’ve never actually played through it myself. Both of these games do a lot more fancy things with their layers than the simple games I showed off last time, so I had to implement some of the fancy functionality that I skipped over in my initial text layer implementation. I implemented tile flipping and scrolling, making my text layers pretty much complete. These games are technically fully playable now, but until I implement object rendering you won’t be able to see your character or various other things.
That’s about it for the graphics this time. I had originally planned on starting work on the aforementioned object rendering after the text layer stuff, but I ended up setting my sights on something else: booting the firmware. Save for missing graphics, homebrew programs seemed to be running pretty well in NooDS at this point, so getting the firmware working seemed to be the next logical step. This ended up proving to be a bit more annoying than I had originally expected though.
As soon as I set my emulator to start executing the BIOS code that eventually leads to booting the firmware, the ARM9 processor promptly exploded. Looking into this, I quickly discovered that there were some problems in my interpreter related to the BLX instruction, one of the branch instructions that allows a program to jump to different locations in the code. First of all, I was completely missing an ARM9-specific variant of the instruction. On top of that, I had a bug in the THUMB version of the instruction that was allowing the program counter to potentially misalign itself when switching back to ARM mode. After fixing these issues, code execution seemed to be staying on track and not rocketing off into unmapped memory.
Now that the code was running as intended, I realized there was a major flaw in my I/O register implementation. Just so you know, major flaws in my implementations are a recurring thing throughout this story. Anyways, I/O registers pretty much control everything in the system, and in a lot of cases I need the emulator to perform some sort of action when the register is written to. To handle this originally, instead of writing values to a block of memory like normal, I had specific variables for every register and I would write to and perform the actions of the register that was mapped to the written address. The problem with this was that programs don’t always write to the exact address of the register they want to change. Sometimes they only write a specific byte of the register, or they write multiple registers at once, and my implementation wasn’t equipped for that. To combat this, the new I/O system works as follows. Writes are sent to a block of memory using a bitmask to prevent writes to read-only bits. After that, the address of every byte that was written is checked to see if an extra action needs to be performed. The new system feels a little messy at times, but it gets the job done. And with that out of the way, I could finally start actually implementing the registers that the BIOS was trying to use.
The first thing I did was a basic implementation of the SPI registers that allowed the ARM7 to access the firmware data. The firmware isn’t actually mapped to system memory, so a Serial Peripheral Interface is used to exchange data with it. The CPU will send a value to the firmware through the SPI, which will then prompt the firmware to return a value to the CPU. The first value the CPU sends is an instruction byte to tell the firmware what it wants it to do. I only needed to implement one instruction for now, which was the read command. After sending the read command, the CPU sends the 3-byte memory address that it wants to read from. From there, the CPU just sends dummy values to the firmware, while the firmware sends its data back one byte at a time. This process is used to transfer the firmware code into main memory so that it can be executed. I managed to get this working with little trouble, so things were looking good.
Here’s where it got scary though. The BIOS refused to continue unless it was able to read from the cartridge. The cartridge, like the firmware, isn’t mapped to main memory, so you have to jump through some hoops to access its data. There’s a set of SPI registers for the cartridge, but the main registers for accessing cart data are a bit more complicated. The most intimidating thing here was encryption. I’ll definitely be tackling this eventually, but for now I wanted to stay as far away from it as possible. I figured that if i just pretended there was no cartridge inserted, I could bypass all of this and just focus on getting the firmware working for now. I still had to implement some basic functionality of the registers to make the BIOS think the transfers were happening, though. This mainly ended up just being a matter of setting the indicator bits correctly, triggering some interrupts, and feeding an endless stream of 0xFF bytes back to the CPU.
My fake cartridge transfers were enough to satisfy the BIOS, but now the ARM7 was just halting itself and waiting for an interrupt. It seemed it was trying to set a timer and then continue execution at the end of the counter. I assume it does this to accommodate for the delayed timing of something. In its current state, NooDS doesn’t really have a timing system in place for its CPU instructions, data transfers, or other things, and everything pretty much happens instantaneously. On a real system though, most things have some sort of delay, so programs will often have to wait before they can retrieve data they requested or other such things. Anyways, timers were pretty straightforward, so I didn’t really get stuck here. After that, I booted up the emulator again and the screens turned white! Taking a closer look at what the emulator was doing, it seemed like the BIOS boot process had completed and firmware code was being executed in the main memory area.
Success! Well, not really. Both the processors got stuck in a loop, which meant we weren’t going to see the DS menu any time soon. I wasn’t sure what they were waiting for, so I took a break from the firmware and instead attempted something I’d been putting off for a while: the FIFO. NooDS already emulated the IPCSYNC register, which is the most basic form of communication between the two CPUs. However, this only allows exchanging 4 bits of data, which is pretty limiting. The FIFO, or First In First Out, is a data queue that can hold 16 4-byte data values. One CPU puts values in its send FIFO, and the other CPU can get the values from its receive FIFO. This is used for many different things, including passing touch coordinates and the status of the X and Y buttons to the ARM9, since these are only accessible by the ARM7. I had tried implementing the FIFO a couple times before, but it never seemed to work so I always ended up scrapping it. While rewriting my FIFO implementation for the third time, I realized, of course, that there was a major flaw in my interrupt system. I didn’t realize that an interrupt could be requested even when interrupts are disabled, and then handled when interrupts are enabled again. This meant that I was missing a lot of interrupts, including the ones that triggered FIFO use. After fixing this, I was finally able to get the FIFO working!
Going back to the firmware, I was disappointed to find that it was still stuck in the same spot as before. Although the firmware needs the FIFO later on in its boot process, it wasn’t the cause of the problem at hand. I decided to analyze the assembly code that was being executed to get a better idea of what was causing the issue. What I found was that the processors were meant to be exchanging values through IPCSYNC as they usually do, but at some point the ARM7’s receive value was getting lost, causing it to get stuck as the ARM9 went on to its next task only to infinitely wait for the ARM7 to catch up again. After seeing this, it didn’t take long for me to find out that I had accidentally been marking read-only bits of the IPCSYNC register as writable, which was causing the value to be mistakenly cleared. I thought for sure I had finally fixed the last issue, and the firmware would boot! But… I was still greeted by nothing more than a white screen.
It was indeed further along now though. I ran into a few CPU instructions I had yet to implement, so I took care of those but ended up getting stuck yet again. I was messing around with the NO$GBA debugger when I realized that- yep, you guessed it- one of my implementations had a major flaw. It turns out those timers I implemented earlier actually increment when they tick instead of decrement. This was causing an issue because the firmware was using a timer with a reload value of zero, and since I was decrementing the timers it would overflow and reload immediately, constantly triggering interrupts and forcing the ARM9 to keep handling them. I fixed this up, but the firmware STILL refused to boot.
At this point I was almost ready for a break. It felt like I was never going to get this thing to work. Before that though, I took one last look at whatever loops the processors were stuck on now, and I noticed something strange. The ARM7 seemed to be getting ready to use the FIFO, but it would check the error bit which was set for some reason and then it wouldn’t bother. I checked to see if any of the error conditions were being triggered in the FIFO, but they didn’t seem to be. It seemed like the firmware was manually setting the error bit and then getting itself stuck because of it. Of course, this was actually happening because of a flaw in my FIFO implementation. I figured that the only reason the firmware would set the error bit like that is if setting it actually acted as an acknowledge of an error and cleared it instead. This might seem strange, but interrupt request bits work the same way, so it seemed to make sense. I changed my implementation to reflect this, and…
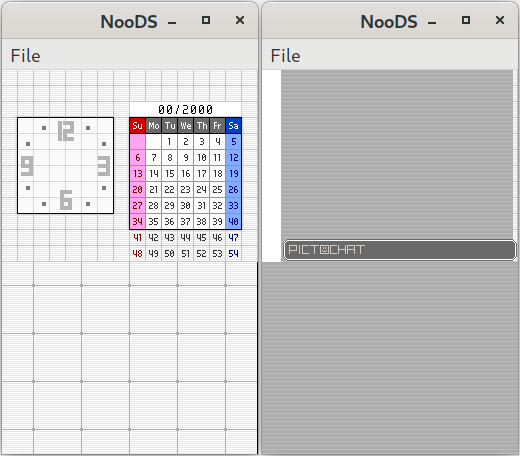
Oh my. Is that what I think it is? It is! The firmware has booted! I can even mess around with it a bit and open Pictochat. Of course, there are clearly some problems here. For one, there are tons of missing graphics. That’s mainly because of those pesky objects that I still need to render. Another oddity here is the calendar claiming it to be the zeroth month. Y’know, the month with 54 days? Well, this is because I haven’t implemented the real time clock yet, so the system has no idea what time it is. But hey, one step at a time here. What’s important is that it’s actually working, and that’s fantastic!
Not only was this quest to boot the firmware both challenging and rewarding, but it helped me discover and fix a lot of important bugs in my code. Commercial games are getting further into their boot process now too, and some even manage to turn the screen on! When I started this project I had no idea if I would actually be able to create a functional DS emulator on my own, but now I’m finally starting to feel like it can happen.
Oh, and if you noticed the new menu bar with the “File” option on it in those screenshots, that’s because somewhere between working on the GPU and working on the firmware I made a basic new UI using wxWidgets. It’s nothing fancy yet, but it has a GUI file browser and an option to boot the firmware, and the aspect ratio doesn’t get destroyed when you resize the window. If you’re interested in trying it out, the source code is of course available on GitHub, or you can hop on the Discord and I can provide you with a build. Anyways, I guess that about wraps it up this time. It was a bit of a long one, but if you stuck with me to the end I thank you for your interest and support! See ya next time~