Finally, Some Good Fricking Progress
So it’s been a few weeks since my last progress report. It’s been hard to find time and motivation to work on stuff, but these last few days I’ve been able to pull myself together a bit and resume work on NooDS. Originally I planned on making these update posts once a week, but I can see now that that’s a bit unreasonable. Anyways, we’re here now, and I have some exciting things to share!
First up we have key input. Incredibly useful of course, but the implementation was nothing special. Honestly I expected there to be a bit more to it, but it was pretty much just setting bits on or off to indicate button presses. It only took a few minutes to implement, but it was the first step to getting back on track and making progress. There were also a few important bug fixes to the interpreter, which fixed the THUMB instruction tests in ARMWrestler and made the ARM7 CPU no longer explode and shoot off into unmapped memory in a lot of homebrew. Oh, and I guess this is noteworthy: I made a Switch build! It’s incredibly bare-bones right now though; it doesn’t even have a UI, but at the very least it runs, and we can get an idea of what the performance is like. More on that later though.
Now let’s move on to the most exciting improvement: the GPU! I talked about this a bit in the previous progress posts, but there are essentially two main display modes on the DS. The much lesser used mode bypasses the 2D engine completely and just renders a raw bitmap directly to the screen. This mode was really easy to implement due to its simplicity. You can see it in action in pretty much all of the previous screenshots I’ve posted. You might notice that in all of those screenshots, only one screen is ever used. That’s because this display mode is only available on graphics engine A, though it can be redirected to the top or bottom screen. Obviously this is super limiting, so 99% of things will use the layer-based 2D engine. This mode involves four background layers and an object layer. I haven’t started working on the object stuff yet, so I won’t talk about here. The background layers will be the focus for today.
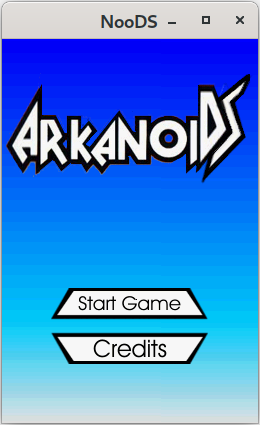
So each screen can use up to four background layers at a time. There are a few different modes that can be assigned to each layer. Parts of the layers can be transparent, allowing for other layers to be seen underneath. The layers can also be rearranged so that different ones will appear on the top. I started my implementation by laying a base that was able to sort and draw layers on top of each other, but didn’t actually render anything to them yet. From here I added in the simplest layer type: a direct color bitmap. This is the one I previewed in the last post; the one that works more or less the same as the VRAM display mode. Of course, it’s not really that simple. This layer can be rotated, scaled, and other fancy things. For now though, I didn’t worry about all that and just added the basic functionality to let it display something. This is sufficient for quite a few things, like the Mx5 demo from the last post, or the menu of this Arkanoid clone I found.
Hey look, stuff is being displayed on both screens! Unfortunately this layer type isn’t used very often, unless you’re looking to display a static bitmap image. A much more commonly used layer type is the text layer, which unlike the name would lead you to believe isn’t just used for text. Text layers are made up of 8x8 tiles; each tile has an index number to a sprite, and the pixels of the sprites are index numbers to a color in the palette. They work similar to the background layer of the NES, actually. Again, there’s some more fancy stuff going on here, but I skipped over that for now and just worked on the basics.
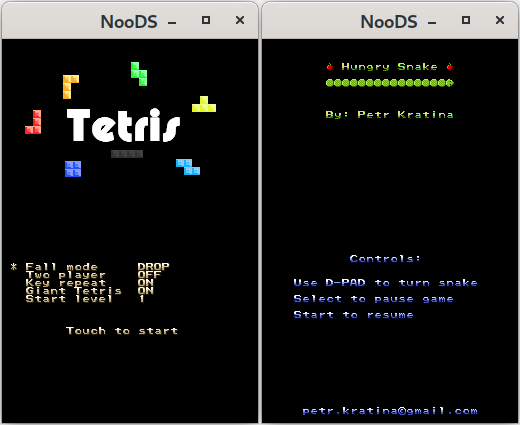
These two games were great for testing text layers because they both use them exclusively. And look, a snake game! How fitting. Unfortunately that one gets stuck on the initial screen and won’t progress into gameplay. Tetris, on the other hand, works pretty much perfectly!
Aside from the text layers, I also had to implement DMA transfers to get these games to display correctly. DMA transfers are essentially bulk memory transfers, like memcpy in C. It seems to be pretty common for DMA transfers to be used to copy assets like sprites into VRAM, and without them these games had nothing to display! My implementation is still incomplete, but it gets the job done for what these games need it to do.
So yeah, that’s where we’re at now. I’m sure there are more homebrews working out there that I haven’t discovered, although unfortunately a large amount of them still display nothing more than a blank screen. But before I go, let’s talk about performance. I don’t actually have a frame counter in place yet, so I don’t have exact numbers, but this is what I’ve observed with the naked eye. When using the basic VRAM display, NooDS outspeeds melonDS by a decent amount. The layer mode, however, doesn’t fare as well. Programs using that currently run slower than they do on melonDS, but that’s no reason to fear! My initial implementation of the layer system certainly has room for optimization, and I’ll definitely be looking for ways to improve it going forward. Aside from that, I plan on playing around with some multi-threading trickery once I get farther along in development. I would say that these results are promising.
Looking into the future, I plan on getting some work done on the remaining graphics layers and then I’ll probably move on to working on getting the BIOS booting. From what I hear it’ll be a struggle, but I have faith that I can overcome it! After that, of course, commercial games will be the target. It’s probably still a fair ways off though. But I’ll be sure to keep y’all updated! Thanks for reading, I’ll see ya in the next one.